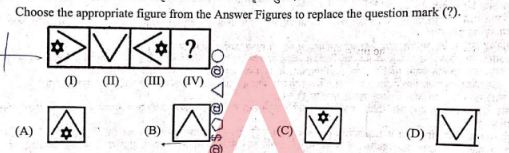
Choose the appropriate figure from the Answer Figures to replace the question mark (?).
- AFigure (A)
- BFigure (B)
- CFigure (C)
- DFigure (D)
Solution & Step-by-step Explanation
Figure (I) consists of a diamond with a star on its left side. It transitions to Figure (II) by retaining only the lower half of the diamond (forming a V-shape) and removing the star entirely.
Applying the same logic to Figure (III), which contains a diamond with a star on its right side, we keep only the lower half of the diamond (a V-shape) and remove the star. This corresponds to the design shown in Figure (D).
Applying the same logic to Figure (III), which contains a diamond with a star on its right side, we keep only the lower half of the diamond (a V-shape) and remove the star. This corresponds to the design shown in Figure (D).