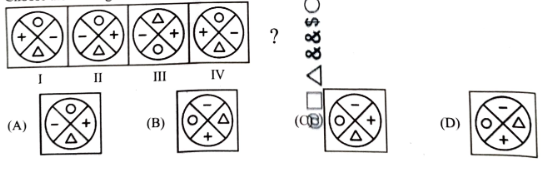
Choose the next figure that continues the pattern.
- AA
- BB
- CC
- DD
Solution & Step-by-step Explanation
Let's analyze the step-by-step transformations between the consecutive problem figures:
1. From Figure I to Figure II: The symbols at the Top and Bottom remain in their positions ( and ). The symbols on the Left and Right swap their positions ( and swap).
2. From Figure II to Figure III: The symbols on the Left and Right remain fixed ( and ). The symbols at the Top and Bottom swap positions ( and swap).
3. From Figure III to Figure IV: The symbols at the Top and Bottom remain fixed ( and ). The symbols on the Left and Right swap positions ( and swap).
4. From Figure IV to Figure V (Next Term): Following the established alternating sequence, the Left and Right symbols will remain fixed ( and ), while the Top and Bottom symbols must swap positions. Thus, the Top becomes and the Bottom becomes .
This results in: Top = , Bottom = , Left = , Right = , which matches the layout corresponding to Option A.