Select the option figure that will logically complete the series when placed in place of the question mark (?).

- AA
- BB
- CC
- DD
Solution & Step-by-step Explanation
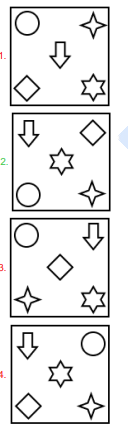
By analyzing the shifting pattern of the symbols across the five distinct positions—Top-Left (TL), Top-Right (TR), Center (C), Bottom-Left (BL), and Bottom-Right (BR)—we observe an alternating cyclic loop movement:
1. From Figure 1 to Figure 2:
* The elements at TL (Circle) and BR (6-pointed star) remain fixed.
* The other three elements shift in a counter-clockwise loop: .
* Therefore, Arrow moves from TR to C, Diamond moves from C to BL, and 4-pointed star moves from BL to TR.
2. From Figure 2 to Figure 3:
* The elements at TR (4-pointed star) and BL (Diamond) remain fixed.
* The remaining three elements shift along the main diagonal loop: .
* Therefore, Circle moves from TL to C, Arrow moves from C to BR, and 6-pointed star moves from BR to TL.
3. From Figure 3 to Figure 4:
* The elements at TL (6-pointed star) and BR (Arrow) remain fixed.
* The other three elements shift in the counter-clockwise loop again: .
* Therefore, 4-pointed star moves from TR to C, Circle moves from C to BL, and Diamond moves from BL to TR.
4. From Figure 4 to Figure 5 (Missing Figure):
* Following the alternating pattern, the elements at TR (Diamond) and BL (Circle) must remain fixed.
* The remaining three elements must shift along the main diagonal loop: .
* Moving them accordingly:
* Six-pointed star moves from TL to Center (C).
* Four-pointed star moves from Center (C) to Bottom-Right (BR).
* Arrow moves from Bottom-Right (BR) to Top-Left (TL).
Thus, the final positions in the 5th figure will be:
* Top-Left: Arrow (pointing down)
* Top-Right: Diamond
* Center: 6-pointed star
* Bottom-Left: Circle
* Bottom-Right: 4-pointed star
This perfectly matches the configuration shown in Option B.