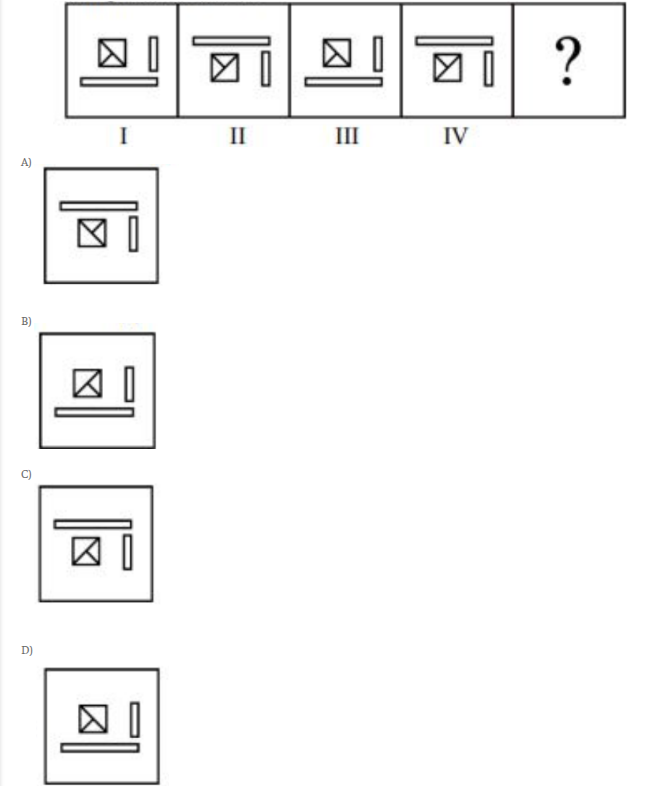
Study the problem figures marked I, II, III and IV carefully to establish the relationship between them. From the answer figures marked (A), (B), (C) and (D), pick out the figure which most appropriately completes the series.
- AFigure (A)
- BFigure (B)
- CFigure (C)
- DFigure (D)
Solution & Step-by-step Explanation
To solve this non-verbal series problem, let's analyze the movement of each component step-by-step:
1. The Long Horizontal Bar:
* In Figure I: It is at the bottom.
* In Figure II: It moves to the top.
* In Figure III: It moves back to the bottom.
* In Figure IV: It moves to the top.
* Following this alternating pattern, in the next figure (V), it must be at the bottom.
2. The Small Square with Diagonal Lines:
* In Figure I: The diagonal line inside goes from the bottom-left to top-right.
* In Figure II: The diagonal line alternates direction, going from the top-left to bottom-right.
* In Figure III: It alternates back, going from the bottom-left to top-right.
* In Figure IV: It alternates again, going from the top-left to bottom-right.
* Following this alternating pattern, in the next figure (V), the diagonal line inside the square must go from the bottom-left to top-right.
3. The Small Vertical Bar:
* It remains constantly on the right side in all figures, so it will remain on the right side in figure V as well.
Combining these rules for the final figure (V):
* The long horizontal bar must be at the bottom.
* The diagonal inside the square must run from the bottom-left to top-right.
This matches exactly with the layout presented in Figure (D).
1. The Long Horizontal Bar:
* In Figure I: It is at the bottom.
* In Figure II: It moves to the top.
* In Figure III: It moves back to the bottom.
* In Figure IV: It moves to the top.
* Following this alternating pattern, in the next figure (V), it must be at the bottom.
2. The Small Square with Diagonal Lines:
* In Figure I: The diagonal line inside goes from the bottom-left to top-right.
* In Figure II: The diagonal line alternates direction, going from the top-left to bottom-right.
* In Figure III: It alternates back, going from the bottom-left to top-right.
* In Figure IV: It alternates again, going from the top-left to bottom-right.
* Following this alternating pattern, in the next figure (V), the diagonal line inside the square must go from the bottom-left to top-right.
3. The Small Vertical Bar:
* It remains constantly on the right side in all figures, so it will remain on the right side in figure V as well.
Combining these rules for the final figure (V):
* The long horizontal bar must be at the bottom.
* The diagonal inside the square must run from the bottom-left to top-right.
This matches exactly with the layout presented in Figure (D).