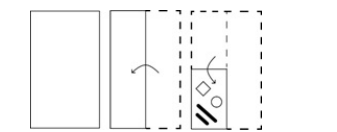
The sequence of folding a paper and the manner in which the folded paper is cut is shown in the following figures. How would this paper look when unfolded?

- AFigure 1
- BFigure 2
- CFigure 3
- DFigure 4
Solution & Step-by-step Explanation
Let's unfold the paper step-by-step to find the final pattern:
1. Unfold Vertically (from bottom to top across the horizontal fold line):
* The cuts in the bottom-right quadrant will reflect symmetrically into the top-right quadrant.
* The circle and diamond will reflect upwards into the top-right quadrant.
* The two parallel slanted lines at the bottom (slanted up-right) will reflect vertically to become slanted down-right near the top edge.
2. Unfold Horizontally (from right to left across the vertical fold line):
* The entire pattern on the right half will reflect symmetrically onto the left half.
* The pairs of slanted lines at the outer corners will face each other symmetrically at both the top and bottom corners, creating a symmetric chevron-like layout.
* The circles and diamonds will replicate symmetrically on the left side of the vertical axis.
This exact layout is perfectly represented in Figure 4.